Sunday, May 27, 2012

Breakfast Apple Blueberry Pie

I made this a while back and although it wasn't a true make-it-up-from-scratch recipe, it was on-the-fly enough not to turn out as planned. And in the end, I turned it into something it wasn't really supposed to be. But never fear...something delicious emerges in the end.

Looks like a perfectly good apple pie, right? Read on...


I adapted a couple of different recipes for this one, but sometimes it's unwise to mess with a good thing. I'll record my version here for informational purposes only, but somewhere along the way, something went a tad awry...

Apple Blueberry Pie - *don't make this!

Preheat oven to 350 F

I wanted the kind of oat crust I used in a cheesecake once, so I did this to get the crust.

Crust
2 cups quick cooking rolled oats
2 tablespoons of unsalted butter, melted
2 tablespoons of maple syrup
3 tablespoons of spelt flour
1/2 teaspoon of salt

Combine ingredients in a medium sized bowl and blend until you have a crumb mixture. Press into a 9' glass pie plate and bake for 10 minutes.

Filling

The filling was a breeze...you can't go wrong with cut up fruit. Or can you? Somehow I did. I think the choice of apple may have been the problem.

8 small gala apples, peeled, cored and sliced about1/2 inch thick
1 cup frozen wild Canadian blueberries
2 teaspoons of maple syrup
1 teaspoon of lemon juice
1 tablespoon of cornstarch (I've never put this in a pie before, but someone else did, so I thought why not give it a go...)


Add the filling to the crust and you're ready for the topping.


Crumb Topping

1/2 cup of spelt flour
2 tablespoons of chopped walnuts
1/2 teaspoon of cinnamon
1/2 teaspoon of nutmeg
1/4 teaspoon salt
2 tablespoons of unsalted butter, melted

Combine to create a crumb mixture and sprinkle over the top of the pie. (In hindsight, the crumb mixture on the top and on the bottom was probably overkill, but I was going for something different.)

Bake at 350 F uncovered for 35-40 minutes.....and then check to see if the apples are soft.

Hmmm...Sadly, they are not even close....put the pie back in the oven for another 15 minutes....

Admire these adorable measuring spoons given as a gift by a dear friend while you wait and wonder why your pie isn't turning out...


Check again to see if the apples are soft. They are not. Maybe not covering it was a mistake.

Put the darned pie back in the oven for 15 more minutes.
 
Repeat a couple of times...Fret some.

In the end...the apples did not cook at all. They just dried up - like, well, like dried apples. And the crumbs got really crispy...kind of like dry granola.

A short aside:
When I was about ten I had a hankering for trying out my skills in the kitchen. But, surprise, surprise, I wasn't content to do things the way they were supposed to be done. So, I proposed to my mom that instead of using the recipe for rice krispies square - that good old fashioned recipe, perfect for a novice chef because it's no fail - I would adapt it. I proposed a bran flakes square. (What a weird kid) And instead of the regular marshmallows to hold it all together, I would use honey. And, because I was a kid, I would add icing. And so I added blue food colouring...blue icing on my bran flakes square. Oh, it turned out exactly as you can imagine. It was simply bran flakes held together with honey, pressed into a pan and topped with blue icing.

I had to eat it all.

My mom wasn't mad or anything, but I had made my own bran flakes square and now I would lie down beside the empty pan with a stomach ache after eating it. And so began my fear and loathing of wasting food. And my inexplicable-after-that-incident desire to mess around with perfectly good recipes. This gave me an idea.

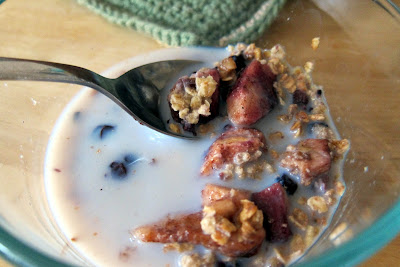
If you can't do it right, do it wrong and figure out how to eat it anyway. Hence the "breakfast" part of the breakfast pie. I scooped it into a bowl, added some milk and ate it like breakfast cereal. Quite good, really.


Never be afraid to try something as long as you're prepared to eat the results.

Tuesday, May 22, 2012

Savoury Summer

I just enjoyed a little breakfast surrounded by my newly planted garden on my treehouse deck.  (I can't take credit for these tasty chocolate croissants, but boy were they good.)


We just wrapped up the Victoria Day long weekend, the traditional start of the gardening season here in Canada. And since fresh herbs are an essential part of my summer recipes, I got busy planting.

In the morning, my back deck looked like this. Just a mess of old dirt and empty pots and dead plants from last season.


About 5 hours later, the transformation:


Not as ambitious as last year, when I started everything from seed, but maybe even better, because I've got an instant oasis.


I planted three varieties of tomatoes


each with a name more whimsical than the last...I'm sure they'll all be stars! (excuse the dirt)


These sprigs of dill came up all on their own from last year. Their appearance - whispy and delicate and shivering in the wind - belies their obvious heartiness.


And then inspired by the creative naming, I grouped my herbs into their own loosly themed pots...it also helps me remember  what's what.

On the left...1/2 of Scarborough Fair (parsley sage rosemary thyme).

On the right... a problem and a solution...(garlic and chives paired with two kinds of mint!) A close up of my "after-dinner mint" below.


Then the lean mean greens ...tarragon, rosemary and lemongrass. (I said loosely themed...I only half thought this through. I don't wany anyone asking why rosemary wasn't up there in the Scarborough Fair pot...)


And finally, the Italian Job (oregano and two types of basil - sweet and dark opal.)


I also threw in some pickling cucumbers, and some zucchini. We'll check back later to see how they do.

Happy days are here again!


Saturday, May 12, 2012

Soft and Chewy Oatmeal Spelt Cookies


I'm trying to eat less white wheat flour and less refined sugar. But everyone needs a little treat now and then, so my challenge this week was to make a cookie that had neither.

Here's what I came up with...an almond, walnut, coconut, cinnamon, spelt flour and oatmeal cookie, sweetened with honey and maple syrup. No need to feel hard done by with these little numbers in the cookie jar...


I did a small batch because the more I bake the more I eat, but you could easily double the recipe for a more traditional sized batch.


Soft and Chewy Oatmeal Spelt Cookies
Makes 16 cookies

1/3 cup grapeseed oil
1/4 cup almond butter
1/4 cup honey
1/4 cup maple syrup
1/2 teaspoon baking powder
1/4 teaspoon baking soda
1 egg
1/2 teaspoon vanilla
1 teaspoon of Ceylon cinnamon* (read more below) or regular cinnamon
3/4 cup spelt flour
1 cup rolled oats
1/4 cup unsweetened shredded coconut
1/4 cup chopped walnuts

Preheat oven to 375 Fahrenheit. Line a cookie sheet with parchment paper. In a large mixing bowl combine oil and almond butter until blended. Add honey, maple syrup, baking powder and baking soda. Beat with electric mixer until combined. Beat in egg, vanilla and cinnamon. Beat in the flour (keep mixer speed on low). Stir in oats, coconut and walnuts.

Drop by rounded teaspoon about 2 inches apart on cookie sheet. Bake 10 minutes until edges are lightly browned. Let cool on a wire rack. Makes about 16 delicious cookies.

Can someone please explain how cookies failed to make this list? C'mon!


* A bit about Ceylon cinnamon:

I recently learned that the cinnamon commonly sold in North American supermarkets is a variety known as Cassia cinnamon. It's dark reddish in colour and tastes like the cinnamon I've come to know. But there is another variety, native to Sri Lanka, the only place where cinnamon is a native plant, known as Ceylon cinnamon (sometimes called true cinnamon.) It is softer and lighter in colour, milder and sweeter, and tastes like a blend of cinnamon and cardamom. It's a bit more expensive and available at health and specialty stores.

A note about my new header:

It's a composite shot of some of my previous recipes, inspired by the creative stylings of ana at imadeitso.com. thanks for the idea, ana!


Saturday, May 5, 2012

Roasted Vegetable Quinoa Salad

An easy make-ahead salad. Great for lunches throughout the week. Toss in whatever veggies you have on hand, but be sure to roast them to bring out their sweetness. Use enough olive oil in the process and you won't need to add anything but a squeeze of lemon at the end.


Roasted Vegetable Quinoa Salad

1 cup dried quinoa
1 medium sweet potato - peeled and cut into small cubes
1/2 red bell pepper - cut into strips
1/2 yellow bell pepper - cut into strips
25 asparagus spears - woody ends removed
1 zucchini - sliced into thin disks
1/4 cup olive oil
juice of 1/2 fresh lemon

Preheat oven to 400 degrees Celsius. Line a large baking sheet with parchment paper. In a large bowl, toss the vegetables in olive oil. Transfer to the baking sheet and roast until vegetables are cooked, but slightly crisp.

In a medium pot, bring 2 cups of water to boil with 1 teaspoon of salt. Add quinoa and reduce to a simmer. Cook with pot lid slightly ajar until fluffy and soft and the water is gone, about 20 minutes. Remove from heat and let sit with pot lid on for about 5 minutes. Fluff with fork.

Toss in the roasted vegetables. Finish with a squeeze of lemon and salt and pepper to taste. Enjoy warm, cool to room temperature or chill and eat it tomorrow and the next day and the next day.


Variations: endless...


Tuesday, May 1, 2012

Simple Kale Salad

Hi friends! Thanks for stopping by...I know it's been a while.

I've been thinking about ways to simplify my cooking while at the same time upping the nutrition of the food I eat. More salads seems like an obvious first place to start. Salads are a quick way to get more fruits and vegetables and preparation can be as easy as chopping and mixing.

This recipe isn't that far off a regular green salad, but I decided to try kale in place of lettuce. The avocado adds calories and creaminess and the raw kale is chewy and soft and really complex in flavour, making this salad substantial and satisfying.


Simple Kale Salad

1 head of organic red kale
1 avocado
1 tomato
1/2 english cucumber
1/3 cup olive oil
juice of one small lemon
sea salt and black pepper

Wash and chop the kale coarsely. Drizzle with lemon juice and set aside for 15 minutes (on the counter, not in the fridge). The acid from the lemon will soften the kale slightly. Chop the remaining vegetables and toss with the kale. Season with salt and pepper and drizzle with olive oil. Serve at room temperature.

The bright mosaic cutting board was purchased on a trip to the UK. Ain't she pretty?