About a week ago came a call for overnight frost. Time to rescue the remaining herbs and tomatoes shivering on the deck.
I washed and separated them. And then got them to pose for the blog:
I grouped some for keeping fresh in the fridge...parsley, basil and oregano...ready for a nice pasta dish.
And hung the rest on the line to dry....mint, rosemary and lemon thyme....which will warm up some hearty meals through the coming fall.
I do realize that I posted about gardening at the beginning of the season and again about gardening at the end of the season, with nothing in between and no recipes at all.
I guess we all have our seasons. I hope to get back to cooking up a storm and blogging up the web again real soon :)
Showing posts with label Herbs. Show all posts
Monday, October 22, 2012
Tuesday, May 22, 2012
Savoury Summer
I just enjoyed a little breakfast surrounded by my newly planted garden on my treehouse deck. (I can't take credit for these tasty chocolate croissants, but boy were they good.)
These sprigs of dill came up all on their own from last year. Their appearance - whispy and delicate and shivering in the wind - belies their obvious heartiness.
We just wrapped up the Victoria Day long weekend, the traditional start of the gardening season here in Canada. And since fresh herbs are an essential part of my summer recipes, I got busy planting.
In the morning, my back deck looked like this. Just a mess of old dirt and empty pots and dead plants from last season.
About 5 hours later, the transformation:
Not as ambitious as last year, when I started everything from seed, but maybe even better, because I've got an instant oasis.
I planted three varieties of tomatoes
each with a name more whimsical than the last...I'm sure they'll all be stars! (excuse the dirt)
And then inspired by the creative naming, I grouped my herbs into their own loosly themed pots...it also helps me remember what's what.
On the left...1/2 of Scarborough Fair (parsley sage rosemary thyme).
On the right... a problem and a solution...(garlic and chives paired with two kinds of mint!) A close up of my "after-dinner mint" below.
Then the lean mean greens ...tarragon, rosemary and lemongrass. (I said loosely themed...I only half thought this through. I don't wany anyone asking why rosemary wasn't up there in the Scarborough Fair pot...)
And finally, the Italian Job (oregano and two types of basil - sweet and dark opal.)
I also threw in some pickling cucumbers, and some zucchini. We'll check back later to see how they do.
Happy days are here again!
Saturday, July 23, 2011
Garden Improv
I ventured into new territory this year, starting some of my garden from seed. I learned a lot and things seemed to be going well. But in the middle of July, in the heat of the summer, I was set to go away on holidays for more than a week. I watched the long term forecast for weeks in advance, worried that my little plants, left on their own, would shrivel in the hot sun and die of neglect. I hoped for a prediction of rain, but summer was in full force...7 days of sun and 30 degree temperatures were expected.
Our neighbours were away; family and friends lived too far away for me to reasonably ask someone to do daily watering duties. So, I started asking around and researching self-watering systems online. I didn't like any of them and didn't want to spend the money on something I could probably make myself. The Internet was full of good do-it-yourself ideas, but many involved initially planting in self-watering pots and I didn't have the time or resources to re-pot.
One family member had a good suggestion - to put trays of water under the plants, so they could draw the water up through the drainage holes in the pots. So, I bought some extra large aluminum roasting pans ($1.99 each at the dollar store) and tested this method one night. But the water only lasted a day in the heat.
My deck is very sunny and I think the reflection off the aluminum just made the water evaporate even faster. So, my next step was to shade the pans with some old rags, essentially creating a skirt around the pan from the edge of the plant pot. This would shade the water and the aluminum pan, hopefully stopping some of the evaporation.
It was a good start, but I knew it would only extend the water supply by maybe one day. Since tomatoes need daily watering I had to do more.
I had seen watering globes at the dollar store - but they were small and only held a few cups of water. They were also made of glass - possibly a bad idea on a windy and high outdoor deck. But, I wanted to do something using the same idea. So, I purchased several 4 litre plastic jugs of spring water ($1.29 a bottle). I poked a hole in each lid using a small nail so that just a tiny drop of water could come out when the bottles were inverted. Then, I poked another tiny hole in the bottom of the jug to let air into the bottle. (I'm not sure if this step was necessary, but I imagined the bottle collapsing in on itself, eventually preventing the water from dripping out.) Then I screwed the upside-down bottles into the soil of the plant pots, until they stood up on their own.
Finally, I wanted to create a bit of shade for the plants, without blocking any rain that might come unexpectedly. The deck is small and the plants share the space with a bistro table and two chairs. I simply tied a plastic table cloth to the backs of each of the chairs and stretched it over the table creating a little banner of shade that sat beside the row of plants. If it rained, they'd still get wet, but for a couple of hours a day, when the sun was at the right angle, they'd be sheltered from the hot sun.
Then I crossed my fingers, told the plants to "hang in there" and left for 8 days.
**********
We came back from our lovely vacation late one evening. It didn't rain once in the time we were gone. We unpacked the car before I went out to check on the plants. I was relaxed and happy after my vacation and I didn't want to rush out to see them in case my experiment had failed.
I opened the door and peered around the corner to see a beautiful sight.
Not only were the bottles either empty or nearly empty, but the soil was moist and the plants had nearly doubled in size over the week.
(pictures were taken the next day, when it was light out and once I'd cleaned the deck up so I could move around)
The tomatoes had flowered....
More than 100 grape tomatoes are on the way....
The peppers are coming along...
The basil's booming...
The dill is divine...
The rosemary is still the underdog, but it's still hanging in there...
Stay tuned for some fresh tomato recipes...send me your favorites!
Our neighbours were away; family and friends lived too far away for me to reasonably ask someone to do daily watering duties. So, I started asking around and researching self-watering systems online. I didn't like any of them and didn't want to spend the money on something I could probably make myself. The Internet was full of good do-it-yourself ideas, but many involved initially planting in self-watering pots and I didn't have the time or resources to re-pot.
One family member had a good suggestion - to put trays of water under the plants, so they could draw the water up through the drainage holes in the pots. So, I bought some extra large aluminum roasting pans ($1.99 each at the dollar store) and tested this method one night. But the water only lasted a day in the heat.
My deck is very sunny and I think the reflection off the aluminum just made the water evaporate even faster. So, my next step was to shade the pans with some old rags, essentially creating a skirt around the pan from the edge of the plant pot. This would shade the water and the aluminum pan, hopefully stopping some of the evaporation.
It was a good start, but I knew it would only extend the water supply by maybe one day. Since tomatoes need daily watering I had to do more.
I had seen watering globes at the dollar store - but they were small and only held a few cups of water. They were also made of glass - possibly a bad idea on a windy and high outdoor deck. But, I wanted to do something using the same idea. So, I purchased several 4 litre plastic jugs of spring water ($1.29 a bottle). I poked a hole in each lid using a small nail so that just a tiny drop of water could come out when the bottles were inverted. Then, I poked another tiny hole in the bottom of the jug to let air into the bottle. (I'm not sure if this step was necessary, but I imagined the bottle collapsing in on itself, eventually preventing the water from dripping out.) Then I screwed the upside-down bottles into the soil of the plant pots, until they stood up on their own.
Finally, I wanted to create a bit of shade for the plants, without blocking any rain that might come unexpectedly. The deck is small and the plants share the space with a bistro table and two chairs. I simply tied a plastic table cloth to the backs of each of the chairs and stretched it over the table creating a little banner of shade that sat beside the row of plants. If it rained, they'd still get wet, but for a couple of hours a day, when the sun was at the right angle, they'd be sheltered from the hot sun.
Then I crossed my fingers, told the plants to "hang in there" and left for 8 days.
**********
We came back from our lovely vacation late one evening. It didn't rain once in the time we were gone. We unpacked the car before I went out to check on the plants. I was relaxed and happy after my vacation and I didn't want to rush out to see them in case my experiment had failed.
I opened the door and peered around the corner to see a beautiful sight.
Not only were the bottles either empty or nearly empty, but the soil was moist and the plants had nearly doubled in size over the week.
(pictures were taken the next day, when it was light out and once I'd cleaned the deck up so I could move around)
The tomatoes had flowered....
More than 100 grape tomatoes are on the way....
The peppers are coming along...
The basil's booming...
The dill is divine...
The rosemary is still the underdog, but it's still hanging in there...
Stay tuned for some fresh tomato recipes...send me your favorites!
Friday, June 3, 2011
My Herb Garden
My summer herb garden is underway - I'm hoping these little beauties will make an appearance in some late summer recipes. I'm limited to what I can grow in containers on the deck, but I've expanded my tiny garden since last year. I have a wider variety of plants, and I even started some from seeds for the first time.
Despite a spring full of cloudy days, what I have so far was looking good...until this morning when I discovered that my dill had been dug up by our resident squirrel. And I do mean resident. We've had a family of squirrels living in the roof for the past year. Now they're living rent free AND they've got a free buffet. What a life! I think I'll have to buy some chicken wire this weekend.
Look at the difference between the left and right sides...
I'm hoping for a salad or two by the end of the summer...Mr. Squirrel permitting.
Despite a spring full of cloudy days, what I have so far was looking good...until this morning when I discovered that my dill had been dug up by our resident squirrel. And I do mean resident. We've had a family of squirrels living in the roof for the past year. Now they're living rent free AND they've got a free buffet. What a life! I think I'll have to buy some chicken wire this weekend.
Look at the difference between the left and right sides...
On the left, the dill was dug up and is almost completely gone, except for a few tiny sprigs that survived Mr. Squirrel's tiny paws of destruction. (I'm hoping I can re-plant...it's supposed to be fairly easy to grow.)
Interestingly, he didn't touch the cilantro. (Hey Mr. Squirrel, I didn't like it much at first either. Lucky for me, I like it now and you don't.)
And, he didn't get to anything else I've got outside...including chives, oregano, tarragon and some parsley and lavender waiting to be planted.
I love the chive flowers...if he touches those, "It's ON!"
Safe and sound indoors, I started a few different plants in a little dome...as you can see the results have been so-so. Some didn't come up at all. There are some sad looking peppers and some wispy thyme.
And, there's one lonely shoot of rosemary. I read that it's notoriously hard to start from seed.
But, there are a couple hearty sprigs of basil...
And, the tomatoes look promising.
I'm hoping for a salad or two by the end of the summer...Mr. Squirrel permitting.
Wednesday, August 25, 2010
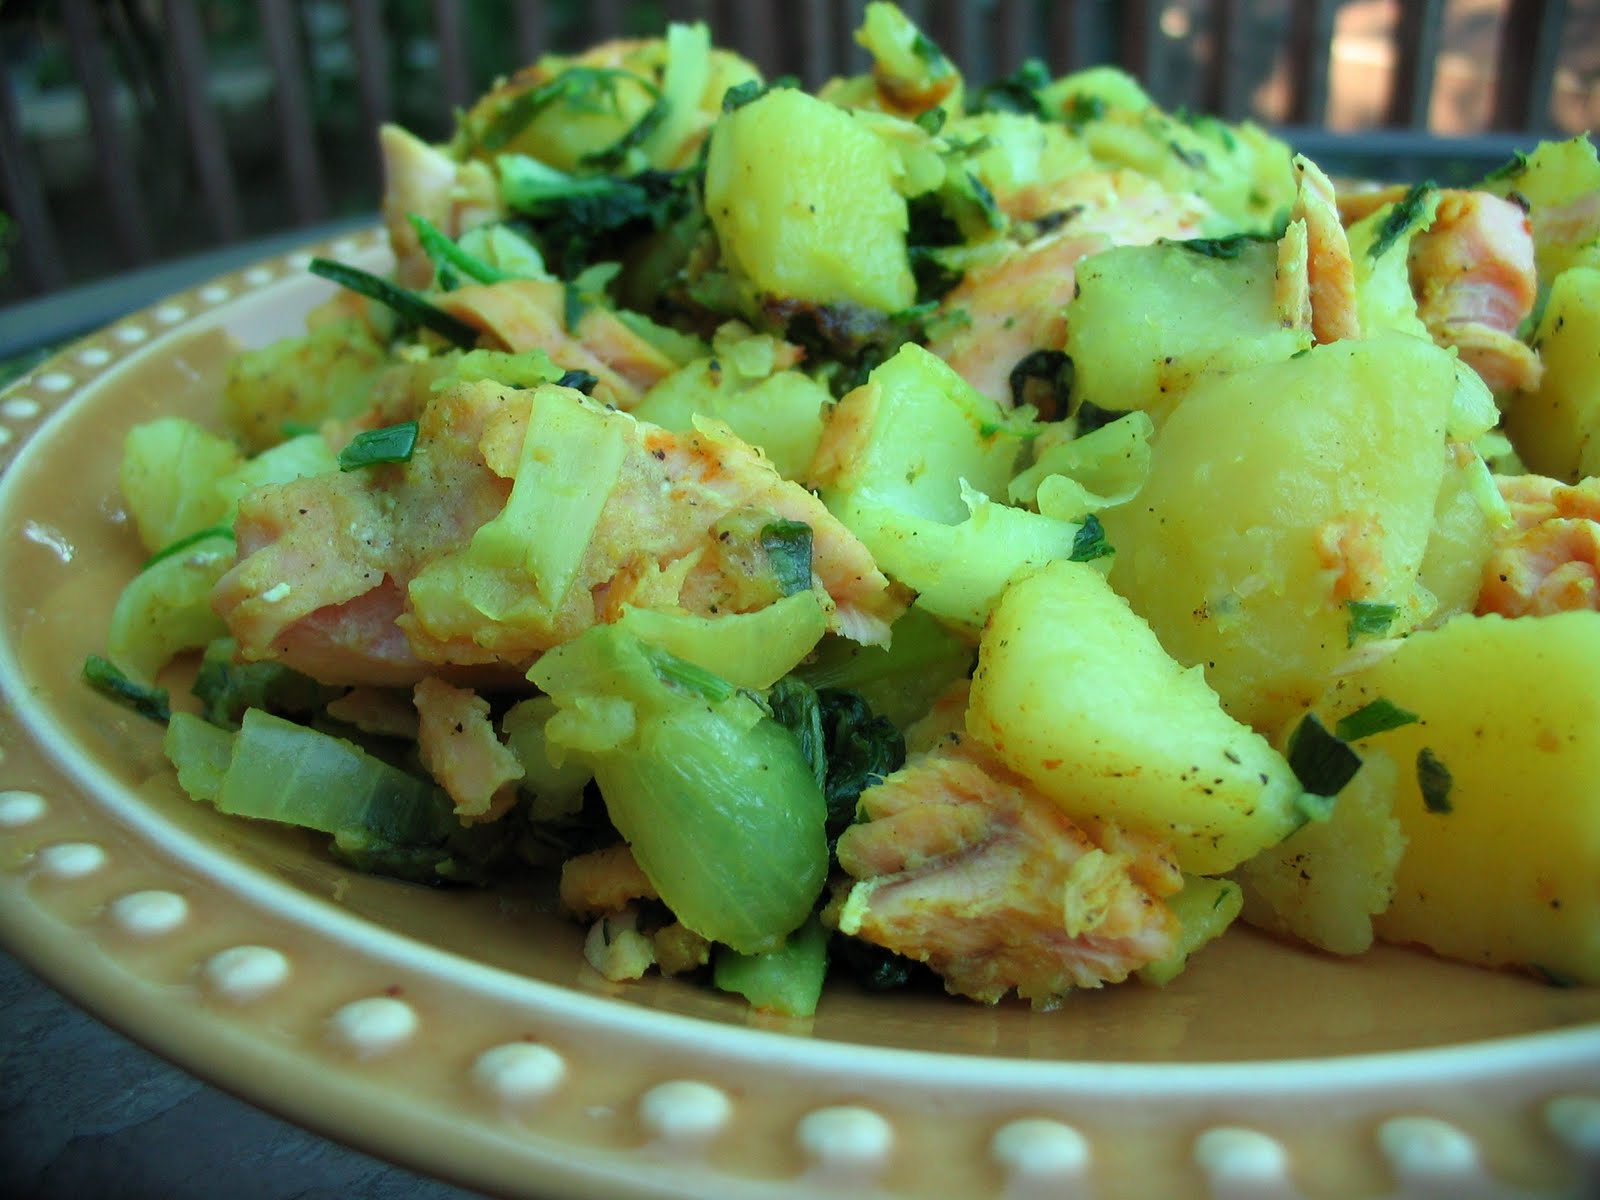
Herbed Salmon Turmeric
Turmeric is a favourite spice in my house. Can you tell from the beat up old label on the spice jar?
A member of the ginger family, turmeric has been recognised for its health benefits for generations in South Asia. And its power as an anti-oxidant has been investigated in medical studies in the United States in recent years. Read more about turmeric…
I use it in all sorts of things - from curry to salad dressing to scrambled eggs. It gives them a bright orange colour and an earthy, peppery flavour. Mr. PL even sprinkles it on popcorn.
Herbed Salmon Turmeric was a recipe I made up to make use of some leftover potatoes. It was even better than I thought it would be, given that it had so few ingredients and was so easy to make.
I had some nice fresh baby bok choy.
And I was lucky that a generous gardener had just shared a huge bunch of fresh herbs.
Herbed Salmon Turmeric
Serves 2
2 boneless, skinless salmon fillets, chopped into large chunks
4 medium potatoes
2 cups mixed fresh herbs, chopped (chives, oregano, basil, green onions and radish greens)
1 cup baby bok choy, chopped
1 medium onion, chopped
1 teaspoon of turmeric
a few shakes of garlic salt
fresh ground black pepper
2 Tablespoons olive oil + more as needed
Cook potatoes - bake them, boil them - however you choose. I started with leftovers. Cut potatoes into cubes and set aside. In a large frying pan heat the olive oil and add the onions, stirring often and cooking until soft and translucent. Add the salmon and potatoes and turmeric, cooking on medium heat until the salmon is cooked through. Add more oil if needed and add the baby bok choy and herbs. Sautée until greens are wilted and salmon and potatoes are browned. Season with garlic salt and black pepper.
In the pan...
Subscribe to:
Posts (Atom)