Saturday, November 24, 2012

Chocolate Kugelhopf


This beautiful Chocolate Kugelhofp, filled with golden raisins, chocolate and brown sugar was made following this recipe from Martha Stewart Living.

What's a Kugelhofp? The Internet, being the wide and wonderful place that it is, describes endless variations and origins. A yeast-risen cake from France (especially Alsace) or Austria or Germany, it is baked in a round fluted pan, filled with raisins and sometimes almonds and dusted with powdered sugar before serving. The legends abound... One story says that the sweet bread was a gift from the three Magis returning from Bethlehem. Another, says that the recipe was brought to France by Marie Antoinette from Austria upon her marriage to Louis XIV. Another still, says it was a victory cake, baked in the shape of the sultan's turban after the Turks were defeated at the gates of Vienna in the 15th century.

This one had the consistency of a sweet bread not unlike a buttery brioche. Typically served with coffee, or at breakfast, I completely concur with the recipe that it's best toasted with a bit of butter. (But that didn't stop us from eating slice after slice just as it was. That's right. WAS. This delicious loaf disappeared quickly...)

I followed the recipe precisely, because I'm not crazy enough to think I can overrule the laws of chemistry, especially after past disasters with breads involving yeast. So, just diving into this project felt risky enough for me. But as always, variations are possible...I think any mix of dried fruit and nuts would work. Cranberries for Christmas would look pretty. This recipe added chocolate, so why not cinnamon?

It took the better part of a day, with all the rising and punching and waiting, but it was a lot of fun. And I learned a few tricks along the way. Like when you have to add a lot of flour to a batter, you should use the attachments on your beater called "dough hooks" (see the second picture below....I was on the verge of a giant mess when I figured this out....)

Here are the delicious results in pictures. I think it turned out perfectly and would highly recommend it. Enjoy!


Tuesday, November 20, 2012

Lentil Soup with Chicken Bacon


I love making big batches of hearty soup. In my house, it takes care of dinner, a couple of lunches and then there's still enough to put in the freezer for another time. The key to this one is the mix of chicken and beef flavours in the broth, and of course the chicken bacon. Start this recipe the day before to allow time for soaking the dried beans and grains.

Lentil Soup with Chicken Bacon
Serves 6 large bowls

2 tablespoons olive oil
2 large carrots
4 stalks of celery
1 large onion
1 cup of green beans
1/2 cup of dried brown lentils
1/2 cup of "soup mix" (found in the dried bean section...it's usually a combo of dried beans, peas and barley)
1 chicken-flavoured bouillon cube
2 beef-flavoured bouillon cubes (I use the all-vegetable chicken and beef flavoured cubes....no MSG)
10 cups of water
3 strips of chicken bacon

Soak the dried lentils and dried soup mix in water overnight or for several hours (at least 6 hours).


Peel and chop carrots and onion. Tip and tail green beans. Chop celery. Place all vegetables in a large saucepan/stock pot with olive oil and sautee on medium until vegetables are soft and onion is slightly browned.


Drain the lentils and soup mix and add to the pot. Add the water and bouillon cubes, cover and bring to a boil. Brown the chicken bacon in a frying pan. It's very lean, so you may need to use a little bit of olive oil. (It may seem counter-intuitive to choose a lean bacon and then add fat, but I prefer the healthier olive oil to the oil in regular bacon...) Once the chicken bacon is crisp, cut it into cubes and add to the soup. Simmer on medium heat, covered, for about 30 minutes until the vegetables are cooked through and the beans and grains are soft.


Sunday, November 4, 2012

Egg and Cheese Sandwiches and Root Vegetable Fries

Brunch!

This meal was awesome and unplanned. It all came together by accident...or by genius! We woke up too late for breakfast, so I decided to go straight to something a little more suited to lunch. A quick look in the fridge and I discovered some spicy hummus, eggs, and some extra old white cheddar. The last of my garden tomatoes had ripened on the counter. Sounded like the perfect mix of ingredients for a tasty sandwich. A few nights earlier, when I had the oven on, I'd chopped up some root vegetables to bake. May as well heat those up, I thought. Since I'd cut them in the shape of fries, my husband decided they needed ketchup. And wouldn't you know...with ketchup, they actually tasted a bit like fries! In less than 10 minutes, we had a and tasty meal that resembled a gourmet "grilled cheese and fries" but without the grilling, and without frying a single potato. Here's how:

Egg and Cheese Brunch Sandwiches
(Makes 2 sandwiches)

4 slices sprouted wheat bread
2 eggs
2 Tablespoons spicy hummus
1 medium tomato
several slices of old white Cheddar
salt and pepper

Special equipment: toaster oven

Toast the bread lightly. Meanwhile, fry 2 eggs in a little bit of olive oil on medium heat, breaking the yolks before you flip them. On one slice of bread, spread 1 Tablespoon of hummus, add 3 slices of tomato, salt and pepper, and one of the fried eggs. Lay cheese slices to cover the other slice of bread and return to the toaster oven on low to melt the cheese and toast the bread some more. Put the 2 sides together. Repeat for sandwich #2.

Recipe Improv: You can personalize this sandwich to your taste...choose your favorite rye or whole wheat bread, try a garlic hummus instead of spicy, and pick your favourite hard cheese if Cheddar's not your thing. This sandwich could also be done on a grill, or in the frying pan, but I wanted a version made without the oil/butter.


Root Vegetable Fries

3 large carrots
3 parsnips
1 Tablespoon olive oil
1/2 teaspoon dried rosemary (remember this?)
salt and pepper

Wash and peel the veggies. Cut them in sticks - roughly 6-10 cm (3-4 inches) long, and 3/4 cm (1/3 inch) in diameter. A better measurement would be to say "make them look like french fries."


Toss them in the olive oil, with rosemary, salt and pepper. In an oven proof dish or casserole, cover with foil and bake at 350 degrees Fahrenheit for 1 hour. Serve with ketchup.

(I made these ahead of time, kept them in the fridge and heated them up for brunch - the time consuming part of this recipe was already done. I'm a big believer in cooking stuff ahead of time and figuring out how to use it later. Whenever you have the oven on anyway, try throwing in a squash or a sweet potato (or a carrot, or a parsnip) to bake. Later in the week you can get creative.)


Wednesday, October 31, 2012

Spicy Bulgur and Collard Green Rolls

Do you like cabbage rolls? Stuffed grape leaves? If so, try this unique variation on a theme, inspired by Fresh Juice Magazine's recipe called Red and Green Roll-Ups. As usual, I looked at the recipe for inspiration and then did my own thing.

I've tried cooking with bulgur before, but the results haven't been anything to write about. Without a real infusion of spice, it can turn out rather bland. But this recipe has plenty of flavour...frying the spices in oil releases the heat.

What's Bulgur? Bulgur is wheat berries (whole, unprocessed wheat kernels) that are partially hulled, steamed, then cracked and dried. Only the outer layer of grain is removed, so it's considered a whole grain. There are 2 kinds of bulgur - one is made from soft white wheat berries and has a milder flavour. The kind I used for this recipe is called brown bulgur which is made from hard red winter wheat berries and has a mild, nutty, earthy taste.

Spicy Bulgur and Collard Green Rolls

1 onion
1/2  red bell pepper
2 garlic cloves
3/4 teaspoon of paprika (I used the grocery store variety, which is most like Hungarian sweet paprika, but this would also be good with hot smoked Spanish paprika if you've got it)
1/4 teaspoon of dried red pepper flakes
1/2 teaspoon each of cumin, coriander and salt
1 1/2 cups of bulgur
1 1/2 cups of chicken broth
3 tablespoons of olive oil
1 large bunch of collard greens - at least 12 large leaves
2 cups passata (tomato puree)

Equipment needed: large skillet with lid, 9x9 inch baking dish, large pot

Finely chop onions, red bell pepper and garlic. In a large skillet, heat 2 tablespoons of olive oil on medium heat. Add onions and red bell pepper and cook until soft. Move onions and peppers off to the side, add another tablespoon of olive oil and cook garlic and all the spices in oil for about 2-3 minutes. Stir often and be careful not to burn.  Add the bulgur and mix everything in the pan together. Cook for another minute or so stirring constantly, allowing the bulgur to toast lightly. Add the 1 1/2 cups of chicken broth and 1 1/2 cups of water. Turn heat to low, give it a final stir, and cover. Let it simmer for about 10-15 minutes, until all liquid is absorbed and bulgur is soft.


Meanwhile, bring water to boil in a large pot. Blanche collard greens for about 2-3 minutes in boiling water. Then remove them with tongs onto paper towels to cool.

Grease the baking dish with a little olive oil. Lay collard greens on a cutting board or other flat surface. Spoon about 2-3 tablespoons of the bulgar filling onto each leaf, rolling them up like little burritos, about 3 inches long, 1 inch in diameter. Put rolls in the dish, making 2 rows, 1 layer.


At this point, feel free to cover and refrigerate the rolls for a day or two and save the final steps for a no-fuss weeknight meal. That's what I did. This recipe was made up to here on the weekend. And tonight, I finished it up when I got home from work.

The final step is to pour 2 cups of passata over the rolls and heat in the oven at 350 degrees celcius for about 40 minutes. You can substitute a more complicated tomato or pasta sauce if you like, but I like the simplicity of the passata, which is nothing but pureed tomatoes. I think it allows the spicy flavour of the bulgur mixture to come through.

Monday, October 22, 2012

Fall Seasoning

About a week ago came a call for overnight frost. Time to rescue the remaining herbs and tomatoes shivering on the deck.


I washed and separated them. And then got them to pose for the blog:


I grouped some for keeping fresh in the fridge...parsley, basil and oregano...ready for a nice pasta dish.


And hung the rest on the line to dry....mint, rosemary and lemon thyme....which will warm up some hearty meals through the coming fall.


I do realize that I posted about gardening at the beginning of the season and again about gardening at the end of the season, with nothing in between and no recipes at all.

I guess we all have our seasons. I hope to get back to cooking up a storm and blogging up the web again real soon :)


Monday, July 30, 2012

First of the Season

My first "Early Girl" tomato of summer 2012.

She's got a bit of character, doesn't she?


Sunday, June 10, 2012

Almond and Hazelnut Cookies


It's possible that in my recent attempt to cut back on sugar and white flour, I'm actually baking more. We're funny creatures, aren't we? Needing to fill some kind of self-imposed gap, I'm constantly thinking of ways to make cookies, cakes, loaves and others desserts with sugar and flour substitutes. My plan to cut back on sweets may be backfiring. Here's another no white sugar, (*almost) no white flour recipe. And in case you are one of those devotees of old fashioned baked goods who is thinking, "I'm not interested in some substitute for a real cookie", I shall include this short quote:

My tester/husband, always happy to taste and give his honest opinion, said, with unrestrained enthusiasm, the following: "This is possibly one of the best cookies I've ever eaten!"

I said, "Can I quote you on that?"

He said, "Yes, and you can also quote me as saying I'll have another one" as he turned and made his way back to the kitchen.

(He has to dilute with 'possibly' and 'one of' because his mom is a MASTER baker and he's a good son.)

Wanting follow up praise and fodder for the blog, I pushed for more compliments..."What do you like about them?"

His reply: "They're only as much of a cookie as they need to be to get the job done."

Well, I consider that a success, because "the job" was satisfying our sweet teeth in our "no sugar" universe. Mission accomplished.

Almond and Hazelnut Cookies     
(recipe inspired by Algerian Almond Cookies)
Makes 16 cookies

1/2 cup of ground hazelnuts (about 1 cup whole)
1 cup of ground almonds (about 2 cups whole)
2/3 cup of honey
2 tablespoons of lemon zest
1 egg white
1/2 cut of all-purpose flour for rolling out cookies (*almost flourless)

Preheat oven to 350 degrees F. In batches, grind hazelnuts and almonds in a blender or food processor until you have the correct amount of ground nuts. In a medium bowl combine nuts, honey and lemon zest. Add slightly beaten egg white and mix well. If the mixture seems too wet, grind and add more nuts until you have a thick paste.


Generously sprinkle a work surface with the flour and roll the dough into two long thin logs (about 8-10 inches long and about an inch in diameter). Use just as much flour as you need to stop the dough from sticking. Press each log to about 1/2 inch flat. Cut cookies about 1 1/2 inch wide on the diagonal. (Your cookies will be roughly diamond shaped.)

Line a cookie sheet with parchment paper and lightly dust the cookies with flour.


Bake at 350 degrees F until just browned, about 15 minutes. Cool on a wire rack. Your finished cookie will be chewy and can keep in an airtight container for up to one week.


Tuesday, June 5, 2012

Polenta with Rapini

So easy and yet so good. If you can handle stirring for 10 minutes straight, you can make this. That's really all there is to it. It's one of my favourite make ahead dishes. You can add any vegetable you like, but I love it with rapini (aka broccoli rabe) because rapini is just so mean and cranky. Just kidding...I mean bitter.

It's really tasty warmed up with some spicy tomato sauce on top, but a cold wedge straight out of the fridge is good, too.

Polenta with Rapini

1 cup of organic cornmeal (I like organic 'cause it is untreated with pesticides and non-GMO)
1 head of rapini
1/2 teaspoon of salt
2 tablespoons of olive oil
1 cup of cold water

Preheat oven to 350 degrees F.

Wash and chop rapini, removing the woody ends of the stalks. In a large frying pan, sautee the rapini in 1 tablespoon of olive oil, just until wilted, but not crisp. Sprinkle with a bit of salt to taste. Set aside.

Grease a pie plate with 1 tablespoon of olive oil and set aside. Bring 2 3/4 cups of water to boil in a medium sized pot. Meanwhile, in a mixing bowl, combine cornmeal and 1 cup of water and 1/2 teaspoon of salt. Slowly add cornmeal to the boiling water, stirring constantly. Reduce heat to low and continue to stir, until mixture is very thick...at least 10 minutes. Add rapini to the cornmeal mixture and immediately pour into the pie plate, spreading as evenly as you can. (The mixture will start to get thicker and harder to work with as it cools.) If you like, brush a bit more oil on the top and bake for about 20 minutes, until the polenta is hot and set. If you add the oil to the top, it will start to get just a bit crispy, too. Remove from oven and cool to room temperature, then refrigerate. Serve hot or cold.

Sunday, May 27, 2012

Breakfast Apple Blueberry Pie

I made this a while back and although it wasn't a true make-it-up-from-scratch recipe, it was on-the-fly enough not to turn out as planned. And in the end, I turned it into something it wasn't really supposed to be. But never fear...something delicious emerges in the end.

Looks like a perfectly good apple pie, right? Read on...


I adapted a couple of different recipes for this one, but sometimes it's unwise to mess with a good thing. I'll record my version here for informational purposes only, but somewhere along the way, something went a tad awry...

Apple Blueberry Pie - *don't make this!

Preheat oven to 350 F

I wanted the kind of oat crust I used in a cheesecake once, so I did this to get the crust.

Crust
2 cups quick cooking rolled oats
2 tablespoons of unsalted butter, melted
2 tablespoons of maple syrup
3 tablespoons of spelt flour
1/2 teaspoon of salt

Combine ingredients in a medium sized bowl and blend until you have a crumb mixture. Press into a 9' glass pie plate and bake for 10 minutes.

Filling

The filling was a breeze...you can't go wrong with cut up fruit. Or can you? Somehow I did. I think the choice of apple may have been the problem.

8 small gala apples, peeled, cored and sliced about1/2 inch thick
1 cup frozen wild Canadian blueberries
2 teaspoons of maple syrup
1 teaspoon of lemon juice
1 tablespoon of cornstarch (I've never put this in a pie before, but someone else did, so I thought why not give it a go...)


Add the filling to the crust and you're ready for the topping.


Crumb Topping

1/2 cup of spelt flour
2 tablespoons of chopped walnuts
1/2 teaspoon of cinnamon
1/2 teaspoon of nutmeg
1/4 teaspoon salt
2 tablespoons of unsalted butter, melted

Combine to create a crumb mixture and sprinkle over the top of the pie. (In hindsight, the crumb mixture on the top and on the bottom was probably overkill, but I was going for something different.)

Bake at 350 F uncovered for 35-40 minutes.....and then check to see if the apples are soft.

Hmmm...Sadly, they are not even close....put the pie back in the oven for another 15 minutes....

Admire these adorable measuring spoons given as a gift by a dear friend while you wait and wonder why your pie isn't turning out...


Check again to see if the apples are soft. They are not. Maybe not covering it was a mistake.

Put the darned pie back in the oven for 15 more minutes.
 
Repeat a couple of times...Fret some.

In the end...the apples did not cook at all. They just dried up - like, well, like dried apples. And the crumbs got really crispy...kind of like dry granola.

A short aside:
When I was about ten I had a hankering for trying out my skills in the kitchen. But, surprise, surprise, I wasn't content to do things the way they were supposed to be done. So, I proposed to my mom that instead of using the recipe for rice krispies square - that good old fashioned recipe, perfect for a novice chef because it's no fail - I would adapt it. I proposed a bran flakes square. (What a weird kid) And instead of the regular marshmallows to hold it all together, I would use honey. And, because I was a kid, I would add icing. And so I added blue food colouring...blue icing on my bran flakes square. Oh, it turned out exactly as you can imagine. It was simply bran flakes held together with honey, pressed into a pan and topped with blue icing.

I had to eat it all.

My mom wasn't mad or anything, but I had made my own bran flakes square and now I would lie down beside the empty pan with a stomach ache after eating it. And so began my fear and loathing of wasting food. And my inexplicable-after-that-incident desire to mess around with perfectly good recipes. This gave me an idea.

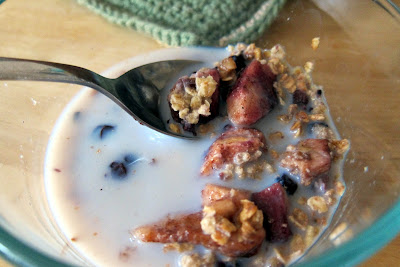
If you can't do it right, do it wrong and figure out how to eat it anyway. Hence the "breakfast" part of the breakfast pie. I scooped it into a bowl, added some milk and ate it like breakfast cereal. Quite good, really.


Never be afraid to try something as long as you're prepared to eat the results.

Tuesday, May 22, 2012

Savoury Summer

I just enjoyed a little breakfast surrounded by my newly planted garden on my treehouse deck.  (I can't take credit for these tasty chocolate croissants, but boy were they good.)


We just wrapped up the Victoria Day long weekend, the traditional start of the gardening season here in Canada. And since fresh herbs are an essential part of my summer recipes, I got busy planting.

In the morning, my back deck looked like this. Just a mess of old dirt and empty pots and dead plants from last season.


About 5 hours later, the transformation:


Not as ambitious as last year, when I started everything from seed, but maybe even better, because I've got an instant oasis.


I planted three varieties of tomatoes


each with a name more whimsical than the last...I'm sure they'll all be stars! (excuse the dirt)


These sprigs of dill came up all on their own from last year. Their appearance - whispy and delicate and shivering in the wind - belies their obvious heartiness.


And then inspired by the creative naming, I grouped my herbs into their own loosly themed pots...it also helps me remember  what's what.

On the left...1/2 of Scarborough Fair (parsley sage rosemary thyme).

On the right... a problem and a solution...(garlic and chives paired with two kinds of mint!) A close up of my "after-dinner mint" below.


Then the lean mean greens ...tarragon, rosemary and lemongrass. (I said loosely themed...I only half thought this through. I don't wany anyone asking why rosemary wasn't up there in the Scarborough Fair pot...)


And finally, the Italian Job (oregano and two types of basil - sweet and dark opal.)


I also threw in some pickling cucumbers, and some zucchini. We'll check back later to see how they do.

Happy days are here again!